Belay anchors
The motto: Optimal, not just okay! The stance is the party’s life insurance — here the two standard cases on modern plaisir routes, plus tether and rope handling.
Building a belay — stance logic
Stance logic in practice — a useful complement to the DAV illustrations below.
Video © Altiora Climbing — watch on YouTube ↗
Stance on one solid fixed point
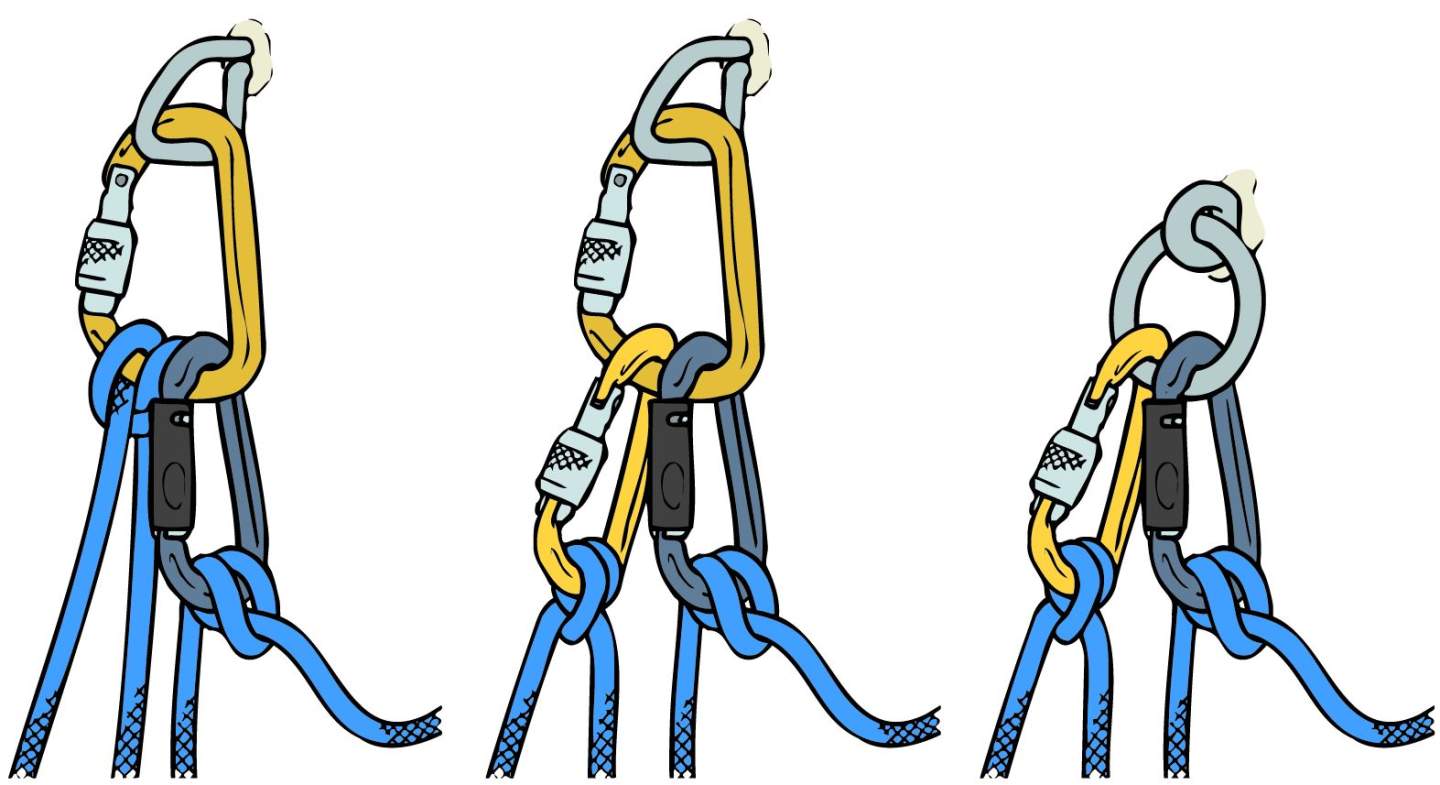
- Glued or cemented ring bolt: personal tether with a clove hitch on the climbing rope and a locker straight in the ring.
- Partner belay with a second locker next to it in the ring.
- Left–right split: if the route continues right, the partner belay sits right of the tether — if left, left of it.
- Bühler without a ring: a large locker “replaces” the ring. The solid arm (no gate) points in the next climbing direction.
- On swinging leads the tether can go into the first carabiner and the partner belay onto its solid arm.
- Separating tether and partner belay in space helps especially on a hanging stance, so the HMS belay stays free to run.
Stance on two fixed points (in series)
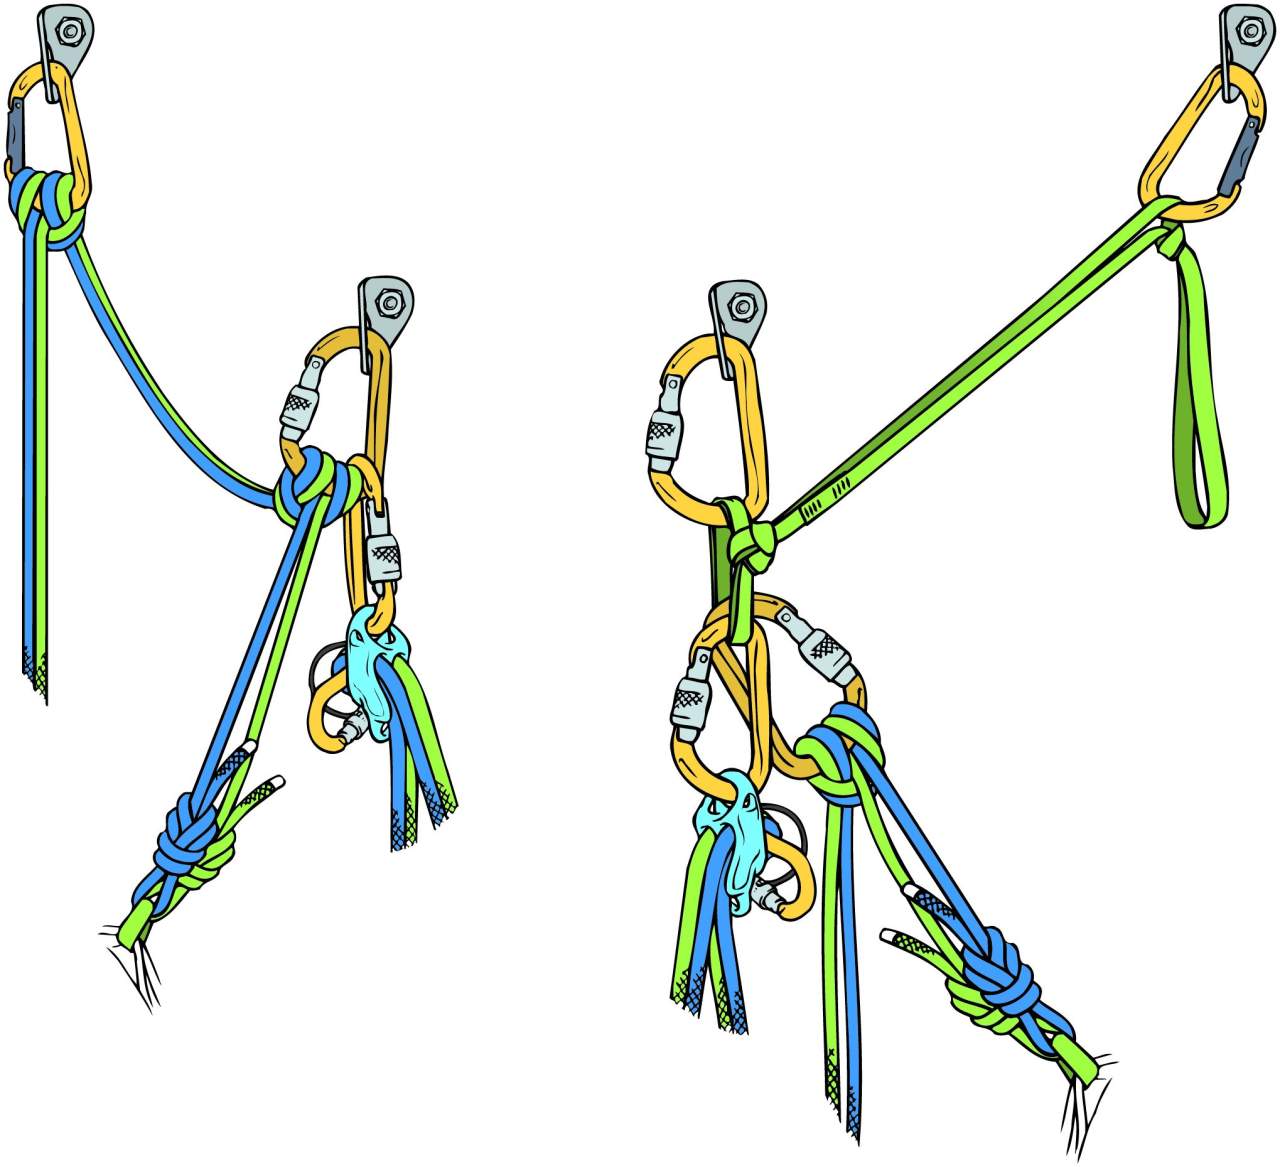
- In-series idea: if one point fails, the next takes the load at once — master point at the lower bolt, both points joined with no slack. On solid bolts this is the DAV base method.
- On doubtful points (pitons, trad gear): share the load instead of series only — split the force across several pieces.
- Usual on two bolts: a pre-tied sling with a double bowline eye. Eye with a locker in the lower bolt, free end in the upper.
- Shorten the sling with an overhand so both points sit tight — don’t pull the bowline eye up.
- Tether with a clove hitch in the eye or the lower locker (split in space), partner belay (HMS) in the eye — watch the left–right split.
- On swinging leads: series with the climbing rope, both points joined with clove hitches. Partner belay in the lower locker, solid arm pointing in the climbing direction.
HMS at the stance — where and how
The partner belay sits on the strand the climber is on — that’s where the load arrives. Carabiner orientation and brake side decide whether the device stays free in a fall.
- HMS on the strand the climber is on — not the “empty” strand beside it.
- Climbing direction: clip the second’s carabiner toward the new line. The solid (“healthy”) arm points in the climbing direction.
- Fast stance method with the climbing rope: second’s carabiner with the gate toward the wall. If a fall yanks it up, the gate stays free and isn’t pressed into the rock.
- HMS brake side on the solid arm — the brake runs over the spine, not the gate.
Tube in guide mode for lowering the second: Rappelling →
Personal tether
- Standard: clove hitch in a locker — length adjusts without opening the system. Keep the tether slightly in tension.
- With two strands, clip both parallel into the carabiner — stops them knotting.
- A sling on the belay loop is fixed length and has to be stowed when you climb — not recommended. If a sling, use an adjustable kernmantle system.
Belay off the point, not the body
DAV: partner belay with HMS off the fixed point is the standard for alpine pitches. Your body is then not in the chain — and in a rescue you can move more freely. Body belay only if every point below really fits:
- Fall pull goes straight up — first piece not off to the side of the stance.
- Weight difference 5–10 kg max (DAV criterion).
- No obstacles (roofs, edges) above the stance — impact risk.
- The belayer hangs at least 1.5 m below the stance (long tether).
- No stance fall / factor 2 into the body: plus-clip or dummy runner at the stance before the leader leaves.
- Experience catching falls over the body — otherwise always belay off the point.
Fall factor — why the stance is serious
- Fall factor ≈ fall distance ÷ rope out. Higher factor means a harder catch.
- At the stance with no redirect a fall can hit factor 2 — the highest load you’ll see in practice.
- Hence: belay off the point (device on the stance), or with a body belay always a plus-clip/dummy runner as the first redirect.
Rope management at the stance
How the rope sits at the stance depends on the lead style: swinging leads and block leading need different methods — the wrong combo costs time and patience.
Swinging leads
Leader and second swap at the sharp end.
Block leading
One climber leads several pitches in a row.
| Lead style | Pileor stance bag | Long to short | Short to long | Pull through |
|---|---|---|---|---|
| Swinging leads(W) | ✓ | ✓ | ✗ | ✗ |
| Block leading(R) | ✓ | ✗ | ✓ Flipping possible — better to pull through | ✓ From the partner’s strand to your own |
Takeaway
Swinging leads
- 1st choice: Pile
- 2nd choice: Long to short
Takeaway
Block leading
- 1st choice: Pile
- 2nd choice: Pull throughFrom the partner’s strand to your own
Pile(or stance bag)
Stack the rope loop by loop in a compact pile — when there’s space (ledge, terrace) or in a stance bag. On swinging leads it pays out from the top cleanly.
Long to short
On a hanging stance let loops hang: start long, each next loop ~0.5 m shorter. The loops don’t snag each other.
Short to long
Loops are built short to long. Flipping is possible — better to pull the rope through fresh.
Pull through
Pull the rope all the way through once the belay is in at the stance. On block leading: from the partner’s strand to your own.
Rope-management matrix after Swiss Power Jet (2022), plus DAV teaching on rope handling at the stance.
Rope management — short version
- Always untangle the rope before starting the next pitch.
- Draping loops over feet or the tether is only so-so — better: a double overhand after each loop and clip it at the stance.
- Which method fits depends on the lead style — see the rope-management matrix above.
Watch out — avoid this
- Several carabiners in one hanger eye
- Partner belay and tether ropes crossing
- Rope loops that can snag or kick off rock
- Unclear rope commands or sequences
- HMS on the wrong strand — the load arrives where the climber hangs
- Gate in the climbing direction / against the rock, instead of the solid arm
Once the stance is built, continue with Rope commands →
Content and illustrations (Georg Sojer) from the DAV Panorama article “Stance sequences on multi-pitch routes” by Max Bolland (issue 5/2024).